IPv6 Networking with AWS VPC
In this blog we will discuss what you can actually do with IPv6 Networking with AWS VPC. This is a slightly longer read than usual, but I’ll try to keep it brief so we can understand the basics comprehensively.
AWS IPv6 Support
On AWS, IPv6 is an option, but it is not enabled by default. Though the support is available, it is not 100% ready yet and is coupled with certain limitations.
Limitations
- DNS names are not allocated to IPv6 addresses.
- IPv6 addresses are all routable and there is no concept of private vs public with IPv6 unlike IPv4.
- Elastic IPs are not relevant with IPv6.
- IPv6 is not supported for VPNs, Customer Gateways, NAT Gateways and VPC Endpoints.
Hence, you are required to be a bit cautious while using AWS with IPv6. As you can see, it is not 100% ready yet.
IPv6 with AWS VPC
Though there are limitations with IPv6, we can still do a normal routing on AWS VPCs, Subnets, Routing Tables, etc. In this blog, we will try to execute the following steps with IPV6. If you are new to IPv6 networking with AWS, I am sure this will be quite a bit of fun!
- Creating a Custom VPC with IPv6 support
- Creating Public and Private subnets with IPv6 support
- Adding IPv6 Routing to VPC Routing Tables
- Using an Egress-only Internet Gateway to enable Internet access from private subnets (this replaces the need of NAT Gateway in IPv4)
Now, lets try out all the above scenarios.
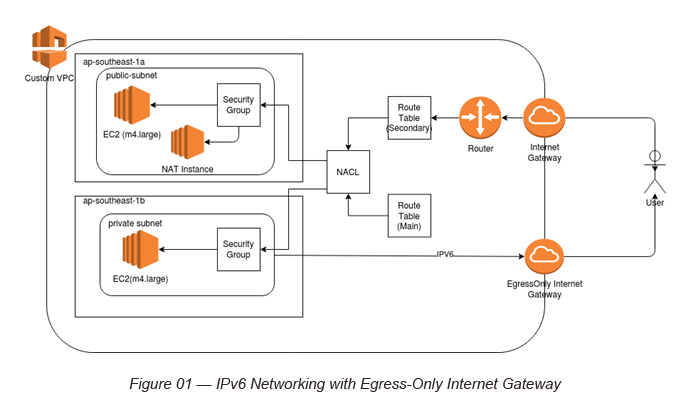
Figure 01, visualizes what we intend to achieve in this blog post. It has a Custom VPC with public and private subnets. The public subnet and the private subnet are routed via two Route tables. The public Route table connects to the Internet via a typical Internet Gateway and the private subnet Route table connects to the Internet via an Egress-only Internet Gateway.
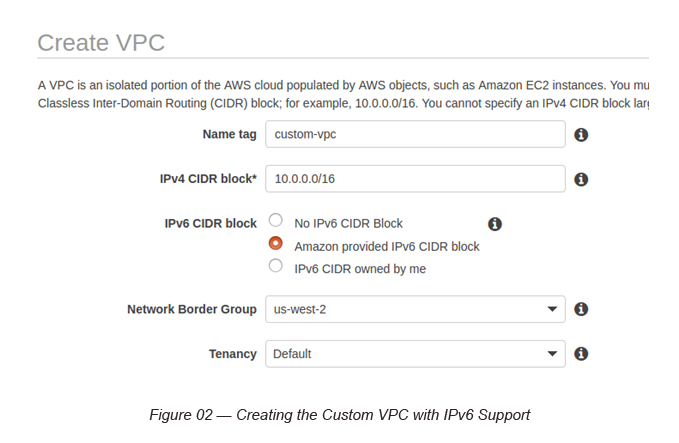
Task 1: Creating a Custom VPC with both IPv4 and IPv6 support (dual support)
Create a Custom VPC with the following IPv4 and IPv6 block ranges.
IPV4 CIDR Block: 10.0.0.0/16
IPv6 CIDR Block: <Select Amazon Provided CIDR Block>
[P.Note: Here, AWS will provide you a /56 IPv6 CIDR Block]
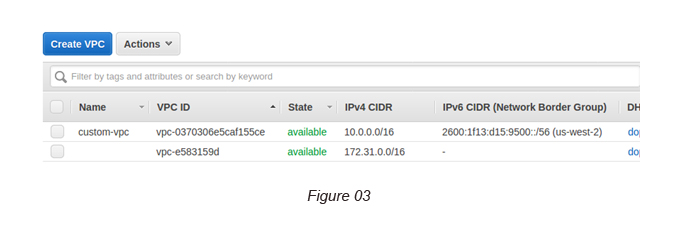
Here, you can see a /56 IPv6 CIDR block is allocated for your VPC (2600:1f13:d15:9500::/56) — [see Figure 03].
Task 2: Creating two Subnets (Public and Private) with IPv6 Support
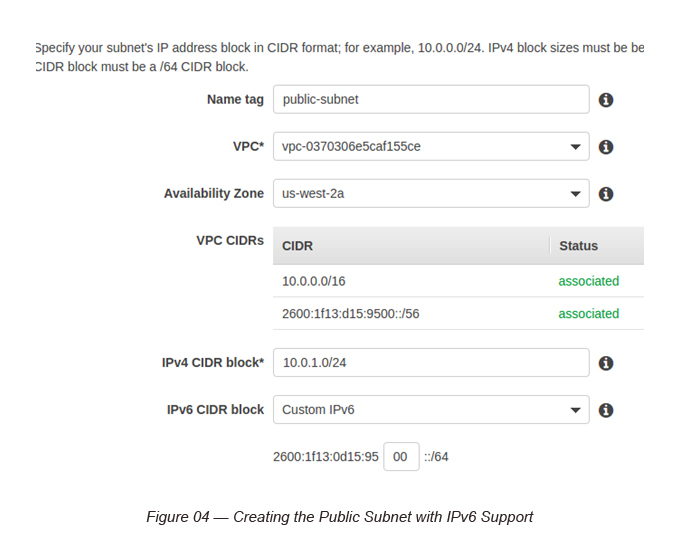
In each subnet, make sure to select “Custom IPv6” and provide a starting point for each subnet IPv6 block.
The public subnet was created with the following CIDR blocks.
IPV4: 10.0.1.0/24
IPv6: 2600:1f13:0d15:95:00::/64
Here, the IPv6 CIDR block starting point is given as 00, and you are automatically given a /64 block.
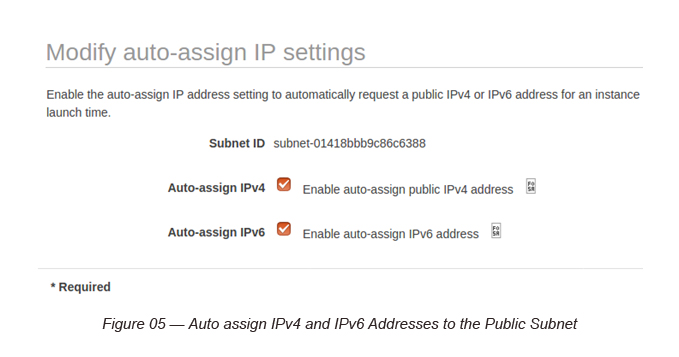
Make sure to enable auto-assign IP addresses (IPv4 and IPv6) both at the Subnet level.
The private subnet was created with the following CIDR blocks.
IPV4: 10.0.2.0/24
IPv6: 2600:1f13:0d15:95:50::/64
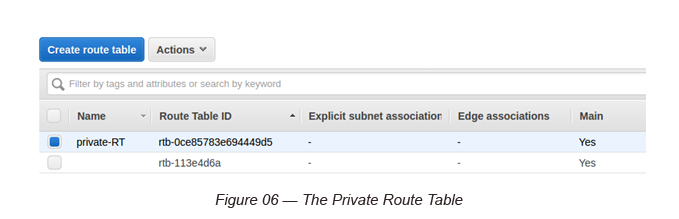
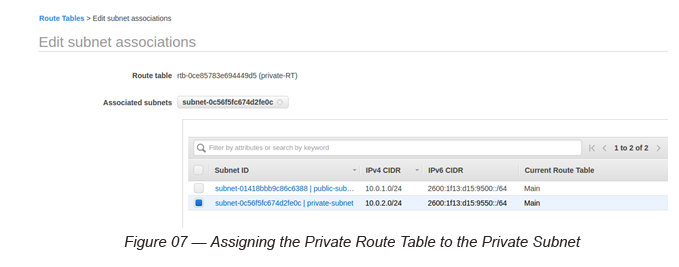
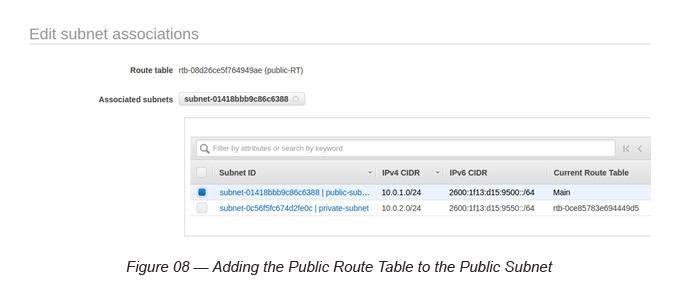
Task 3: Creating two Route Tables and assigning Subnets to them
Go to Route Tables and name the Main Route Table as the “private-RT” and assign the Private Subnet to it.
Then create a new Route Table and name it as the “public-RT” and assign the Public Subnet to it.
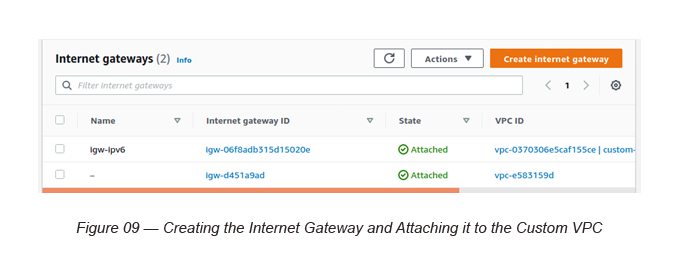
Task 4: Creating an Internet Gateway and attaching it to our Custom VPC
Create the Internet Gateway (igw-iPv6) as below and attach the Custom VPC to it.
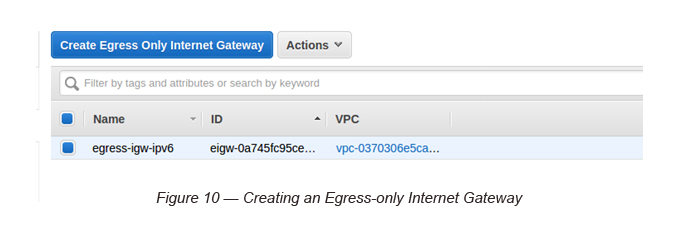
Task 5: Creating an Egress-only Internet Gateway and attaching it to the Custom VPC
Here we use an Egress-only Internet Gateway to connect to the Internet via private subnet EC2 instances. In Ipv4, we used to execute this task with the help of NAT Gateways.
Task 6: Adding Routing Entries to the Public Route Table
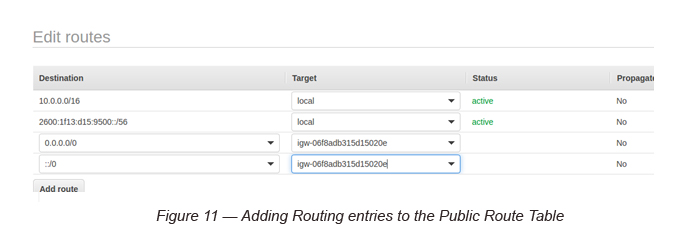
You need to add the following two entries to both IPv4 and IPv6 and attach them to the Internet Gateway.
0.0.0.0/0 for IPV4 → Target (Internet Gateway)
::/0 for IPv6 → Target (Internet Gateway)
Task 7: Adding Routing Entries to the Private Route Table
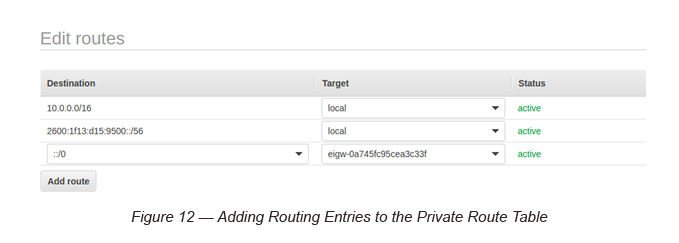
You need to add the following entry to IPv6 and attach it to the Egress Only Internet Gateway.
Task 8: Creating a public EC2 instance in the Public Subnet
1. Select an Amazon Linux 2 AMI (HVM), SSD Volume Type
2. Select m4.large EC2 instance type (we select a larger EC2 instance type here for more support in IPv6. You can try t2.micro, but it may not function in IPv6 as intended. But, this can change in the future).
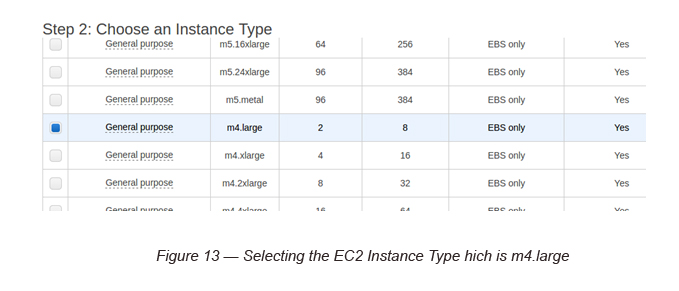
P.Note: We have selected m4.large here in order to get full support for EC2 instances. Though t2.micro instances do support IPv6 now, I have witnessed many issues while working with them. So to be on the safe side, we will experiment with m4.large for the moment. Bearing in mind though, it is not under the free tier.
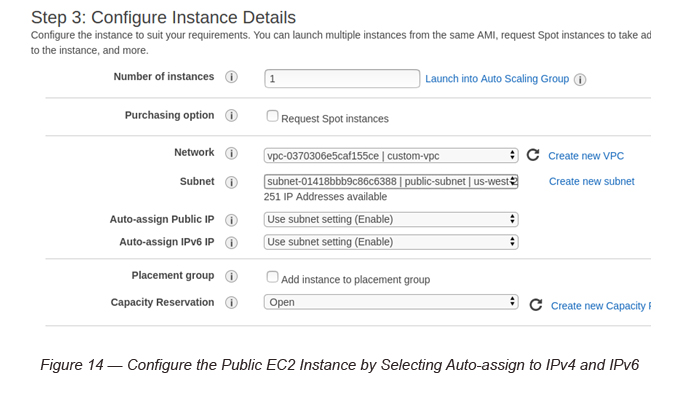
3. Select the Custom VPC and the public subnet and make sure to enable both IPv4 and IPv6 auto-assign IP checkboxes.
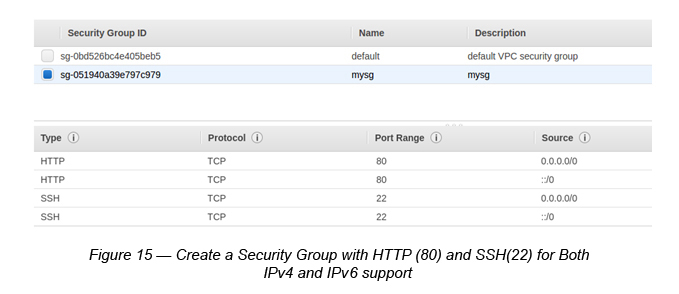
4. Create a new Security Group with SSH port 20 and HTTP port 80 for both IPv4 and IPv6.
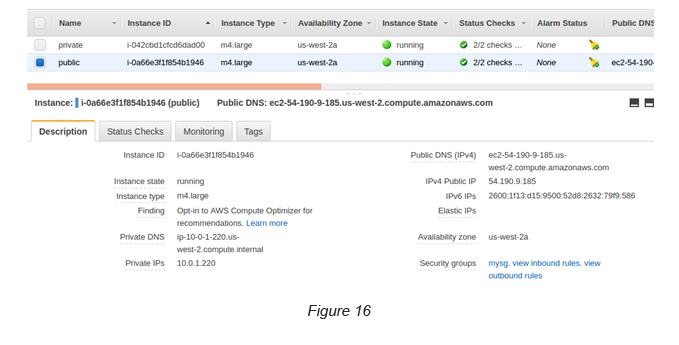
5. Launch the public instance. Once it is launched, you can see two public IPv4 and IPv6 addresses assigned to the instance (see Figure 16).
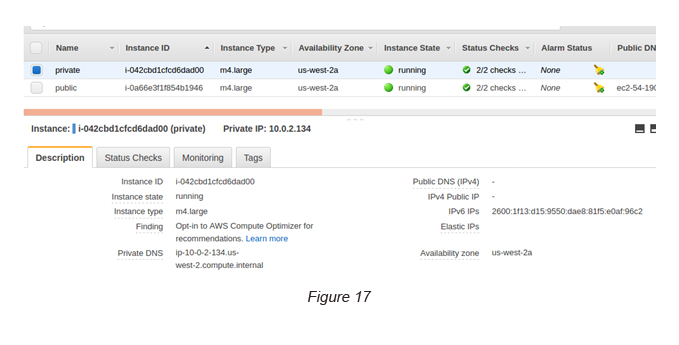
Task 9: Create a private EC2 instance in the Private Subnet
Follow the same steps that you followed in Task 8 and create a private instance in the private subnet.
Once the instance is created, make sure to assign an IPv6 address to the instance in order to access it later. This can be done by Actions → Networking → Manage IP Addresses → IPv6 Addresses → Assign new IP.
Task 10: Test the Public EC2 Instance
SSH into the public EC2 instance and install Apache (HTTPD).
$ ssh-add -k <the-pem-file>
$ ssh -A ec2-user@2600:1f13:d15:9500:52d8:2632:79f9:586
[Here 2600:1f13:d15:9500:52d8:2632:79f9:586 is the IPv6 address of the public instance]
$ sudo yum update
$ sudo yum install httpd
$ cd /var/www/html
$ sudo vi index.html (Add some text to the file)
$ sudo service httpd start
Now you can access the public instance via the IPv6 address on your selected browser (see Figure 18).
P.Note: you may have to enter the IPv6 address within square brackets on the browser URL.
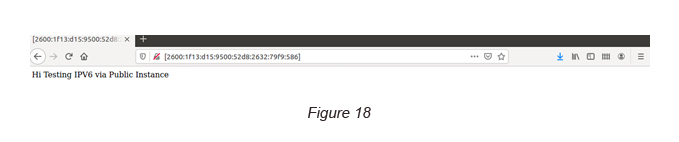
Congratulations! You have accessed an Apache website via an IPv6 address.
Task 11: Test the Private EC2 Instance
Now it is time to check how the private instance behaves with an Egress-only Internet Gateway.
1. SSH into private instance via the public instance as the bastian host. For this, please do SSH into the public instance first.
$ ssh -A ec2-user@2600:1f13:d15:9500:52d8:2632:79f9:586
[ 2600:1f13:d15:9500:52d8:2632:79f9:586 is the IPv6 address of the public instance]
Now you should be inside the public instance.
2. SSH into the private instance.
$ ssh ec2-user@2600:1f13:d15:9550:dae8:81f5:e0af:96c2
[ 2600:1f13:d15:9550:dae8:81f5:e0af:96c2 is the IPv6 address of the private instance]
3. Now you can access the private instance via the IPv6 address on your selected browser.
Theoretically, it should not work!
4. Can we now check for Internet access from the private EC2 instance?
In IPv4, this was possible with the help of NAT instances/ Gateways. However, here we will be testing with an Egress-only Internet Gateway.
Try and install Apache in the private instance. It should work if you have done all the steps properly so far.

Crishantha Nanayakkara
Vice President - TechnologyDeveloping a Custom Audit Trail and a Notification Service for a Workflow Based Serverless Application on AWS
READ ARTICLE
Human Emotions Recognition through Facial Expressions and Sentiment Analysis for Emotionally Aware Deep Learning Models
READ ARTICLE